Introduction
As more people work from home due to the current human malware situation, an increasing number are choosing to use a desktop PC as their primary machine. Another popular reason to use a desktop PC is for PC gaming. Finally, if you need to run CPU or GPU intensive workloads, a desktop PC gives you the ability to have a lot more performance than any laptop can offer. Desktop machines also offer more performance for less money than an “equivalent” laptop. For all of these reasons, many people are building their own desktop machines from parts. This post will give you some guidance for avoiding common DIY PC building mistakes.
Personally, I think it is fun and relatively easy to build a typical desktop machine from parts, but I know that not everyone shares my opinion! If you have never built a PC (or the last time you did it was many years ago), it is easy to make some common mistakes.
Some of these mistakes will prevent the machine from operating at all, while some will just hurt your performance and reliability. The purpose of this post is to help you avoid some of these common DIY PC building mistakes.
Avoiding Common DIY PC Building Mistakes
We’ll assume that you have all of the components that you need to build your machine, and that they will all work together. That may be an incorrect assumption, but we will start with that. I’ll start out with common problems that will prevent your machine from even turning on.
PC Won’t Operate
Some key assembly mistakes will absolutely prevent your new machine from turning on at all, or prevent the machine from POSTing. POST stands for power on self test, and this sequence has to complete successfully every time your machine starts.
Not installing the CPU EPS power cable
Modern motherboards usually have two power connectors from the power supply. One is a large, 24-pin connector with a very thick cable. The other is a smaller 6-pin or 8-pin EPS power cable. Note: some high-end motherboards have two 8-pin EPS power cables.

If you don’t connect the CPU EPS power cable, your machine is not going to start. This is a very common mistake. This is the first thing you should check if your newly assembled machine won’t turn on.
Not installing PCIe power cable(s) for your video card
Any discrete graphics card that uses more than about 75 watts of power is going to need one or more PCIe power cables coming from the power supply. These PCIe power cables usually have two 8-pin connectors, but your video card many only have a single 6-pin connector, or a single 8-pin connector.
You need to supply and connect whatever PCIe power connectors that the video card requires, or else you won’t get a video signal. In some cases, you will get a signal, with an error message telling you to connect the PCIe power cable(s). This is also a very common mistake that is easy to correct.
Not connecting the motherboard front panel connectors
Depending on your PC case, there will be several pretty small front panel connectors that you must connect to the correct pins on the motherboard. Otherwise, your machine won’t operate normally. These usually include a 2-pin power switch connector, a 2-pin reset switch connector, a 2-pin power LED connector and a 2-pin HD activity connector.
If you don’t connect the power connector, your computer won’t turn on when your press the power button on the case. Some motherboards have a separate power button on the motherboard itself. This internal power button is not very useful when the case is closed. You can also use a screwdriver to momentarily bridge the two power pins on the motherboard. This is useful if you want to try turning on the machine before you have installed the motherboard in the case.
The other connectors are not strictly necessary, but it is better to connect them so that you get the full functionality from your case.
Your motherboard manual will have a diagram showing where these front panel pins are located and how they are laid out. Frankly, connecting these is a pain in the neck, and is one of my least favorite assembly steps.
PC Will Operate, but with reduced performance
Other common assembly mistakes are more difficult to detect. Your machine may turn on and appear to work normally, but you may have some minor to major issues that you are not aware of.
Installing components in wrong slots
Modern PC components are designed to make it difficult to assemble them incorrectly. Most components and slots are keyed and aligned so that they will only fit together in one direction. Despite this, it is still pretty easy to accidentally install some components correctly, but in the wrong location, i.e. the wrong slot. If this happens, the PC will probably still work, bit you may be giving up a lot of performance.
Memory slot population
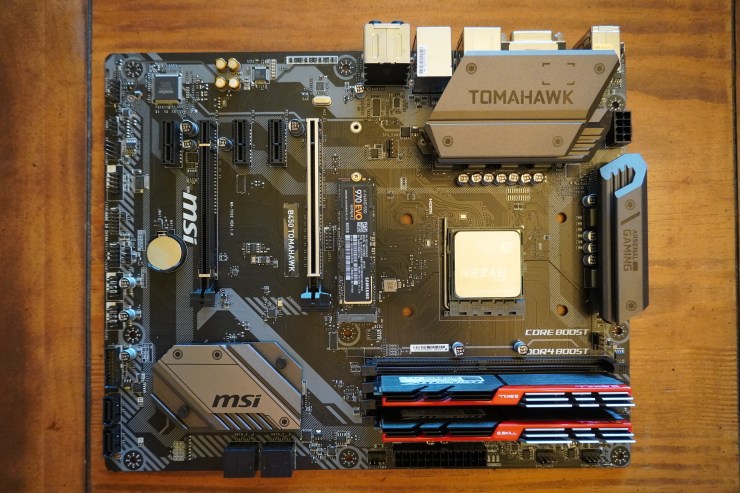
For example, most modern mainstream desktop motherboards have four memory slots. If you only install two memory DIMMs, it makes a big difference which two slots you populate. When you do it correctly, the memory will be running in dual-channel mode (which gives better performance). If you do it incorrectly, the memory will be in single-channel mode, which reduces your memory bandwidth and performance.
In the MSI B450 Tomahawk motherboard pictured above, you can see where the two memory DIMMs are installed. They are in the second and fourth slot away from the CPU.
Video card location
Video cards are another example. Many motherboards have two or more PCIe expansion slots where you could install a video card. Depending on your exact motherboard, some PCIe slots are better than the other ones for performance. For a video card, you want the slot with the highest PCIe version and the highest number of PCIe lanes.
You also want a PCIe slot that is connected directly to your CPU, rather than to the motherboard chipset. This usually means the PCIe slot closest to the CPU. You should consult your motherboard manual to make sure you are using the best slot.
In the picture below, the top PCIe slot is closest to the CPU. That is where you would want to install your primary video card.

M.2 slot location
A similar situation exists with PCIe M.2 slots (usually used for storage cards). Depending on the motherboard, some slots will have a higher PCIe version and more PCIe lanes than the other slots. Whichever slot is the “best” one should be used for your boot drive. This usually means the M.2 slot closest to the CPU. Again, you should consult your motherboard manual to make sure you are using the best slot.
Installing fans incorrectly
Most desktop PCs will have multiple fans. These might be case fans, CPU cooler fans, chipset fans or radiator fans. Unfortunately, it is very common for people to install these fans incorrectly. This means that they are blowing air in the wrong direction, so they are less effective.
Most desktop PC cases are designed so that colder intake air should enter from the front and bottom of the case. The hotter exhaust air should exit from the rear and top of the case. You need to make sure your fans are installed in the correct direction. They should blowing the air the way it was designed to go.

I have seen many people install their fans backwards, so that they are all intake or all exhaust fans. This makes the case hotter inside, which makes the components run hotter. This will reduce your performance and potentially reduce the longevity of your components. This is particularly important for CPUs, GPUs, and M.2 storage cards.
Most fans have a directional arrow that shows which way the air will blow. You can also tell this by which way the blades are curved. If all else fails, you can feel the air direction when the fan is running. I talked about this in more detail in my post “How Do You Orient Case fans?“.
Not using enough case fans
Many lower priced cases may only have one or two fans that are included with the case. Depending on the case design and the thermal load of your components, this may not be enough to maintain proper ventilation in the case. Many stock case fans are smaller diameter fans that don’t move that much air. The stock fans can also be quite noisy when running at higher speeds.
In addition, most stock case fans only have three-pin fan connectors. This means they don’t have a pulse-width modulation (PWM) control, so the only way to change the fan speed is to change the voltage. Four-pin PWM fans let your motherboard control the fan speed more precisely.
Depending on your situation (and budget) you might want to add more case fans or replace the stock case fans with larger and/or better model fans. This can dramatically lower the temperatures inside the case, and can also make it much quieter.
Leaving plastic cling coating on parts
Many PC components are packaged with some sort of plastic cling wrap to prevent them from becoming damaged during shipment. Common examples include CPU heatsinks, video cards, and power supplies. It is important that you remove all of this wrapping from your components.
This is extremely important on a CPU heatsink! Having that plastic coating in place will dramatically reduce the heat transfer to the heatsink. With many other components, it is more of a cosmetic issue. Still, you should make sure no plastic coating is blocking any ventilation holes or slots.
Installing power supply incorrectly
Most PC power supplies have an internal fan with ventilation holes or slots on one side of the power supply (in front of the internal fan). The most common design is that the fan is an intake fan, which pulls cold air into the power supply and exhausts it out the back of the case. Many PC cases have ventilation holes or slots at the bottom of the case where the power supply is mounted. Having the power supply mounted in the right direction makes this all work the way it was designed.
Some PC power supplies don’t have a fan, so they rely on passive cooling from an internal heatsink, with ventilation holes or slots on one side. These types of power supplies usually should be installed with the ventilation holes facing upwards. One exception is PC cases with power supply shrouds. Once again, read the manual that came with your case and with your power supply to make sure you are doing it correctly. Seasonic has a very helpful set of diagrams that show how this should work.
Not using CPU thermal paste
Some CPU coolers come with CPU thermal paste or pads pre-applied from the factory. If that is the situation, you should probably just use that solution. Many CPU coolers don’t have any CPU thermal paste, so it is very, very important that you apply some thermal paste before you install the CPU cooler.
Thermal paste fills any small voids between the integrated heat spreader (IHS) on the top of the CPU and the contact plate on the bottom of the CPU cooler heatsink. Having the right amount and coverage of thermal paste is critical to help the CPU cooler do it’s job effectively.
Of course there are endless debates about how to properly apply thermal paste! As long as the IHS is completely covered with at least enough paste to fill the small gaps, you should be good to go.
Using too much CPU thermal paste
Another common issue is using too much thermal paste. Having too much thermal paste can reduce it’s effectiveness, and makes a mess. This post from Gamer’s Nexus, “Too Much Thermal Paste” – Benchmark of Thermal Paste Application & Quantity does a good job investigating the issue.
Other Assembly Issues
There are other, usually more minor problems that you should try to avoid. These issues don’t typically prevent the system from working or cause major performance woes, but they are things to think about.
Assembly Order
You should try to install as many components as possible on the motherboard before you install the motherboard in the case. This includes the CPU (and CPU cooler, if you are using an air cooler), the memory, and your M.2 storage cards. It is usually much easier to install these components when the motherboard is still outside the case than trying to do it inside the case.
For many years, I didn’t do this. I would install the motherboard in the case first, then install all of the components on the motherboard. This is just harder than it needs to be, especially with a smaller case. Lesson learned!
Not using motherboard standoffs
Depending on whether you are using an ATX or micro-ATX motherboard, you may need to move some of the motherboard standoffs. The standoffs must line up with the holes on your motherboard. Most motherboards have at least nine holes for motherboard screws. These are used to secure the motherboard to the case, using the standoffs.

Most newer cases will have markings next to the holes where the motherboard standoffs are installed. These will be “A” for ATX motherboards and “M” for micro-ATX motherboards. You simply screw in the standoffs into the correct holes in the case. You can also hold the motherboard in place where it will be installed to make sure the holes in the motherboard line up with the stand-offs on the case.
Not installing the motherboard I/O shield
Most motherboards come with a small rectangular metal I/O shield. This shield fits around all of the I/O ports on the back of the motherboard. These include things like USB ports, network ports, audio ports, etc. The I/O shield needs to be installed in the case in the correct direction. You need to do this before you install the motherboard in the case.
Many newer motherboards have an integrated I/O shield that is connected to the heatsink for the CPU VRMs. This is a much better design that eliminates the hassle of installing an older style I/O shield in the case. It also eliminates the possibility of losing the I/O shield.

Not connecting USB cables from the case to the motherboard
Modern motherboards will have a number of different types of USB ports on the back of the motherboard. These ports are accessible through the I/O shield. Your motherboard will also have some internal USB connectors on the motherboard. You need to connect them to the USB cables coming from the case. This makes it possible to use the USB ports that are usually present on the top of the computer case.
There are usually some USB 2.0 connectors and at least one USB 3.0 connector. Some motherboards might have a USB 3.1 or 3.2, or even a Thunderbolt connector. If you don’t properly connect these, you won’t have that functionality from the USB ports on the case.
Not doing any cable management
Personally, I take some pride in trying to do a pretty decent job with the cable management inside my systems. I try to take advantage of the cable management features built into the case. In addition, I always route the cables so that they are hidden as much as possible.

If I can’t hide them, I try to make them look tidy with cable ties. I also buy components with an eye towards cable management. I use fully modular power supplies to reduce cable clutter. Using an M.2 PCIe NVMe drive that mounts directly on the motherboard eliminates additional cable requirements.

So why does this matter? Well, it can help improve ventilation inside the case and make it slightly more resistant to dust buildup. But really, it is just a point of pride to not have a rat’s nest of cables inside my case.
Closing the case before you make sure everything works
This is more of a superstition, at least with me. I can’t tell you how many times I have built a system, and put both sides back on the case. Then, I tried turning it on, with no success. Doing this angers the PC gods. It actually seems to increase the chance that the system doesn’t turn on the first time.
If it doesn’t turn on, you are going to have to open up the case to start troubleshooting anyway. I have long since learned to not button up the case before I try turning it on.
Final Words
Building a PC from parts for the first time can be intimidating. It is actually not difficult after you have done it a few times. The key thing is to actually read the manuals for your PC components. This is especially important for the motherboard manual. It is very easy to make mistakes because you just don’t understand the proper or “best” way to install your components.
Hopefully this post has pointed out a few of the more common problems that you might run into. After you build your system, you might want to read my Seven Setup Tips for a New AMD Ryzen 3000 System post. This will help you get the most out of a new AMD desktop system.
If you have any questions about this post, please ask me here in the comments or on Twitter. I am pretty active on Twitter as GlennAlanBerry. Thanks for reading!
7 thoughts on “Avoiding Common DIY PC Building Mistakes”