Introduction
I recently released a new YouTube video, called “How to Flash the Gigabyte Z690 AERO G DDR4 with Q-Flash Plus“. This video walks through and demonstrates all of the steps required to use the Q-Flash Plus feature on the Gigabyte Z690 AERO G DDR4 motherboard.

Q-Flash Plus is a special feature that lets you flash the BIOS without having a CPU, RAM, or video card installed. The most common reason you would want/need to do this is if you had a new CPU that was not supported by the existing BIOS version on the motherboard.

The Q-Flash Plus procedure may be more valuable later this year when Intel Raptor Lake processors are released, since they probably won’t work in this motherboard without an updated BIOS version. This feature can also be useful if a more traditional BIOS update (using the Q-Flash BIOS utility or the @BIOS Windows utility) failed.
This technique will also work on a fully assembled system, so there is no need to remove all your components to use this procedure.
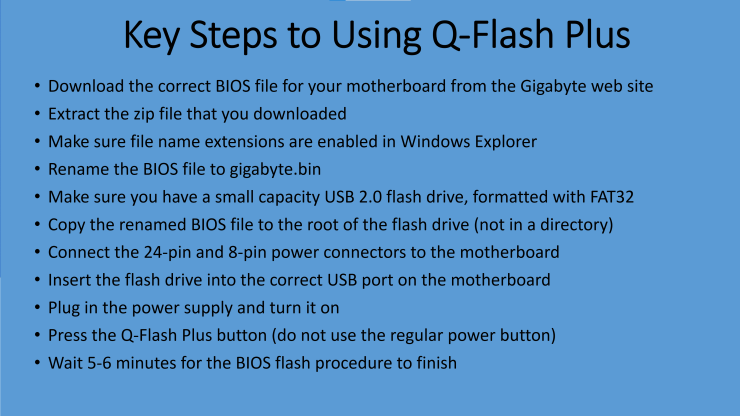
How to Flash the Gigabyte Z690 AERO G DDR4 with Q-Flash Plus
Here are the key steps that I show in the video.
Here is the video.
Final Words
I think this is a useful video right now because the documentation on the product web site and in the motherboard manual is a pretty sparse. Gigabyte also has their own YouTube video showing how to do this, but it uses a different motherboard.
I also have blog post about doing this same type of operation for several other motherboards.
If you have any thoughts or questions about this post, please ask me here in the comments or on Twitter. You can also follow me on Twitter, where I am @GlennAlanBerry. Thank you for reading!
thank you
Thank you! While I wait for the QFlash Plus to do its thing I wanted to comment on why some people may have trouble with this process:
1. Use 1 mb or smaller USB 2.0. I used 128 mb.
2. The System Volume Information folder auto-created in the drive (even after formatting) may cause issues. To prevent the creation of the folder WinAeroTweaker has a great article on creating a new 32-bit DWORD value named DisableRemovableDriveIndexing (set to 1) under the registry key ‘HKEY_LOCAL_MACHINE\SOFTWARE\Policies\Microsoft\Windows\Windows Search’.
3. I would add disabling the folder’s read-only flag as a follow-up step after editing the registry. This isn’t mentioned in the WinAeroTweaker article.
4. Restart.
5. Format USB to FAT32 with 1024 kb allocation for 64 mb to 128 mb USB or 2048 kb for 128 to 256 mb USB
6. Follow the rest of your directions
In my experience, the vast majority of people won’t need to do all of the extra steps that you outlined. Adding those steps will just confuse many people. I would also be leery of advising the average non-technical user to be editing the Registry.
Most of the time, the reason that people have problems with this procedure is because they make some basic mistake, such as downloading the BIOS for a different motherboard, not renaming the BIOS flash file etc.
Hi again, Glen
Firstly, I want to say THANK YOU! I followed your directions (System Volume Information notwithstanding) and it worked perfectly. You’re great!
A few notes I wanted to share with you and get your take (not that these are news to you). Maybe some of these are worth mentioning to your readers/viewers:
(A) Without integrated graphics in the CPU, the GPU must be installed and should be connected to the monitor with an HDMI (not DP) cable when test booting after the process.
(B) Without an OS installed, after I flashed the bios and pressed the case power button the BOOT LED stayed on. I was quite concerned I screwed up. This issue wasn’t covered in your video or any other video and guide I could find. The Gigabyte manual says (p.33) says, “[. . .] if the BOOT LED is on, that means you haven’t entered the operating system yet.” In hindsight it’s obvious to me that’s why the BOOT LED is on, but for a few minutes I was pretty worried.
(C) Regarding the System Volume Information folder in the root of my 128 MB USB, have you encountered that folder in a USB you have used to flash? If so, does the Q Flash Plus process work with that folder in root next to the .bin file? I went the extra mile to remove the folder because I was concerned having in root would be problematic. A 1 GB USB 2.0 drive I checked didn’t have that folder in root.
(D) You wrote, “Adding those steps will just confuse many people. I would also be leery of advising the average non-technical user to be editing the Registry.” Yeah, that makes a lot of sense. Especially if the folder in root isn’t problematic during the flash process.
And again, THANK YOU! Do you accept tips (like, for a coffee)?
In my previous comment step 1 should have listed 1 GB as the max USB size, not 1 MB lol. Sorry for the typo. And your guide was great! I have now flashed my first bios after building my fist PC!
I have tried this, but nothing happens when I press the Q-Flash button. As if the power supply is DOA. No LED’s on the MoBo light up, the power supply does nothing. If the USB stick was bad, or the file wasn’t installed right, wouldn’t the LED or PSU at least do something?
The PSU is a Corsair RM1200x Shift (Silent Mode), I figured maybe this was why the PSU fan doesn’t turn, but not sure.
Is this a brand-new system that you just put together?
Are the main 24-pin and the 8-pin EPS power connectors connected to the motherboard?
Are the connectors fully seated?