Introduction
Since I am a PC hardware enthusiast, I naturally have way too many PC systems and components. From time to time, I sell some of my systems and parts to free up space and money for new components. One thing I always do when I sell a used system is to take every step I can to make sure it is in the best shape possible before I sell it. This post will cover some of the steps necessary when refurbishing an old PC.
Take Inventory
If you are anything like me, you probably have quite a few old parts and even complete systems stored away, literally gathering dust. Before you decide what to do with them, it is a good idea to figure out what you actually have. Take a little time to identify what parts you have, i.e. motherboard and CPU models, RAM, storage, video cards, etc.
Once you have model numbers, you can use your favorite search engine to get more details about the more important components. This might include when it was first available for sale, what its specifications are, and what it is currently worth.
After you have a list of your major components, you can make a more informed choice about what to do with them. Maybe you have enough parts to build a complete system that you could sell or donate to a family member or friend. Perhaps you just have a few parts that might be old to you but they could be a valuable upgrade to someone you know.
It may be that you are just doing “free tech support” for a friend or family member, looking at their existing system to see what can be done to improve it for little or no money. Adding RAM and installing any sort of SSD are the low hanging fruit for many old systems. Cloning a magnetic hard drive to a SATA SSD makes a huge difference and is easy to do.
Some parts you may have are probably just so old and incompatible that they are going to be a waste of time to refurbish or repurpose. Some of your old components may not even work anymore. Unless you just like to collect old parts for historical purposes, you should just properly recycle your really old and/or non-working components. Please don’t just throw them in the trash. Electronic components have lots of things in them that should not be in a landfill.
Inspect and Clean Your Components
If you are looking at old components that have been idle for a period of time (perhaps years), you should inspect them closely for any physical damage. For example, old motherboards may have leaking or bulging capacitors. It is also common to find broken SATA and USB ports.
Old systems and individual components may be pretty dirty, with lots of dust buildup. Many desktop cases have dust filters that are likely to be clogged with dust and dirt. This is especially true if there are pets in the household. Getting all of that cleaned up makes it much easier to work on the system, and it will also improve the thermal performance of the system.
You can use canned air or even an electric leaf blower to blow dust and other crud out of cooling fins, fans, cases, etc. There are also small electronic air dusters made for this purpose. A micro fiber cloth moistened with just a little water or household cleaner can be used to cleanup and remove many stains from plastic, non-electronic parts.

With motherboards and CPUs, there are a couple of things that I always do. Desktop motherboards have a small CR2032 battery that lets the BIOS keep its settings when the system is powered down or unplugged. Replacing that battery with a new one is a good idea. CPUs will have thermal paste between the integrated heat spreader (IHS) and the heat sink of the CPU cooler.
Over time, that paste will harden and degrade. It is a good idea to remove the CPU cooler, clean the old paste out, and then apply new thermal paste. On this ASUS SABERTOOTH Z77 motherboard that I recently sold, I replaced the CMOS battery (which is under the “Thermal Armor” plastic cover). I also replaced the thermal paste under the CPU cooler.
Plan Your Strategy
Once you know what you have to work with, then you can decide what makes the most sense. For example, if you have multiple motherboards, multiple CPUs, and numerous other parts on hand, you need to decide what you want to build to get a complete system. Personally, I try to match components that would have been in the same price range and performance level when they were new. So, I would not put an Intel Core i3 CPU into a high-end motherboard. If I had a limited amount of RAM sticks (DIMMs), I would favor the higher end components. You should think the same way for your other components, such as power supplies, storage, graphics cards, etc.
Test Build Your System
Especially with used parts, it is a good idea to build the system on a bench or tabletop. You can use a piece of cardboard to rest the motherboard on if you don’t have anything better. Then you can install most of the components in a temporary fashion to see if everything seems to work. This is much easier than installing everything into a case. It also makes it easier to do any troubleshooting by swapping out individual components on the test bench.
I have a video about how to do the initial assembly on a test bench.

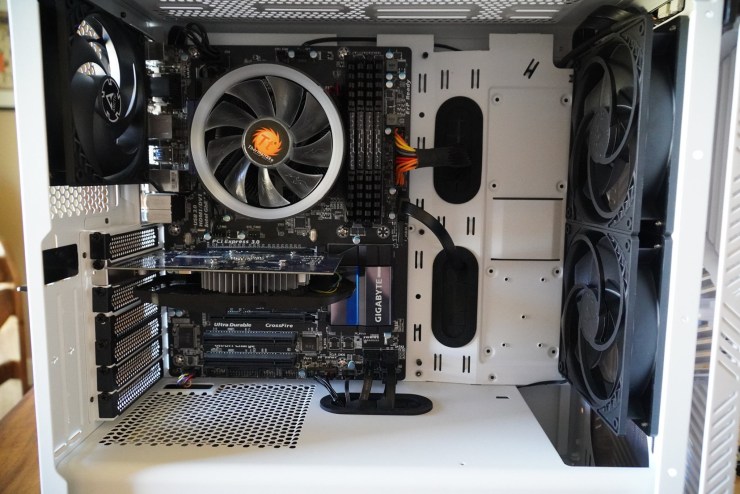
Once you are sure everything works, you can install all of the parts into the case. After you are sure everything works inside the case, you can do some cable management. Older cases don’t have as many cable management features as newer cases, but I still think it is worth a few minutes of effort.
You can see what a few minutes of cable management work can do, even in an older case. Thinking about how you can install components so that the cables are naturally hidden as much as possible also helps. Nylon zip ties make cable management much easier!

Final Steps
It is quick and easy to install Windows 10, version 2004 from a USB thumb drive. In my experience, it does a good job of installing drivers for most older components. Despite this, you should check the motherboard vendor’s web site to see if they have any Windows 10 drivers. Depending on how old your motherboard is, the vendor may or may not have Windows 10 drivers for things like your chipset, LAN, integrated audio, etc. I also see if there is a BIOS update for the motherboard.
If you have any brand name components, such as video cards or storage, you should check with the vendor for drivers and utilities. For example, if you have a Samsung SSD, you should install Samsung Magician. This will let you see if there are any firmware updates for your SSD. If you have an NVIDIA video card, you should install the latest NVIDIA drivers for that card. You can also check with Intel or AMD to look for chipset drivers for your motherboard.
Final Words
Recently, I updated another system using a new case, which I think turned out pretty well. New cases make it much easier to build a nice system!
I currently have components for several systems for sale. I will probably be adding more items to that page in the near future. This might include systems using these CPUs:
- Intel Core i7-4790K
- AMD Ryzen 5 3600
- Intel Core i7 6700K
- AMD Ryzen Threadripper 1950X
- Intel Core i7-8700K
If you have any questions about this post, please ask me here in the comments or on Twitter. I am pretty active on Twitter as GlennAlanBerry. Thanks for reading!