I have been a home brewer for about three and half years now. Over this time, I have brewed 37 five gallon (20L) batches of beer. I still consider myself to be a relative beginner, especially compared to people who have been brewing for far longer, perhaps brewing hundreds of batches.
Three of these 37 batches were “malt extract” batches, meaning that you use dry malt extract (DME) or liquid malt extract (LME) to reduce the amount of work, time, and equipment needed on brew day.
The rest of my batches have been “all-grain”, which means you start out with milled barley that you have to take through more steps to produce wort. This takes quite a bit more time and effort, but it gives you more control over the finished product.
An extract batch typically takes about two-three hours from start to being in the fermenter, while an all-grain batch usually takes roughly five-six hours to get to the same point.
I started entering home brew competitions about three years ago, not doing so well in my first few attempts. Since then, I have managed to win 27 medals so far, which is a pretty decent start.
Recipe
Similar to cooking or baking, most home brewers start out by finding and closely following a recipe for a particular style of beer that they want to brew. You can find beer recipes online, in books, and in home brewing magazines. Once you have a recipe, most people go into their local homebrew store (if they are lucky enough to live near one) to buy the ingredients for the recipe. Otherwise, you can order your ingredients online.
As you gain experience and confidence, many home brewers will start to modify recipes that they have found, to achieve a desired effect. For example, you might decide to use an extra pound or two of your base malt to help push the alcohol level higher. This is where I still am, taking recipes that I find, and slightly modifying them.
More experienced and dedicated home brewers will often buy common ingredients in bulk and properly store them at home. They will also often create their own recipes from scratch, trying to use the ingredients they already have on-hand. This can be much more economical than buying just the amount that you need for each individual batch.
One thing to keep in mind is that many beer styles may have originated in a particular country or region. They usually will use ingredients from that region or country. For example you might have a Belgian beer style that uses Belgian malt, Belgian hops, and Belgian yeast. In this case, I brewed a Biere de Garde, which is a French/Belgian style.

Preparation for Brew Day
I usually go to my local home brew store (which for me is The Brew Hut in Aurora, CO) a day or two before brew day. Armed with my recipe, I find and weigh out the base malt and all of the specialty malts before running them through the grain mill at the shop to open up the hard external shell of each barley grain. A five gallon batch typically requires between ten and twenty pounds of grain. I have a five gallon food-grade plastic bucket with a lid so I can seal the milled grain in an air-tight container.
After milling the grain, I find the desired hops and yeast packets that are required for the recipe. Since I live at about 6500 feet altitude, I always use more hops than the recipe calls for, since hop utilization is reduced by altitude. I usually add about 50-100% more hops, depending on the beer style and the grain bill.
I usually use liquid yeast packs that I prepare the day before brew day with a yeast starter that I have on a magnetic stir plate running for 18-24 hours before brew day. The idea here is to have a higher number of healthy yeast cells, so that you get a vigorous and clean fermentation of your boiled wort. This is especially important with high gravity (high alcohol) styles and with lagers. Remember the old saying “Brewers make wort, but yeast makes beer”.
I also get my brewing equipment setup, with all of my hoses and pumps connected on my brewing cart in the garage. I get the propane bottles connected and the electrical system plugged in (for the pumps and the mash temperature stabilization system).
Finally, I run about nine gallons of tap well-water through an under-sink Filtrete carbon filter to remove any chlorine or chloramine. I also add a Campden tablet to the filtered water just to make sure any chlorine or chloramine is gone. This water goes into the hot liquor tank on the brewing cart, with the lid on overnight to keep anything else from getting in the water.
In Figure 2, the boil kettle is on the left, with the mash tun in the middle and the hot liquor tank is on the right.
Brew Day
Early on brew day, I light the propane burner under the hot liquor tank and start heating the hot liquor (or strike water) up to about 170-175 degrees Fahrenheit. Once it gets up to temperature, I transfer about six gallons (depending on the recipe) to my insulated Ss Brewtech Infusion Mash Tun. You want the strike water to be about five-ten degrees warmer than your desired starting mash temperature since the colder grain and mash tun will absorb some of the heat.

Once you are satisfied with the strike water temperature in the mash tun, you slowly pour the milled grain into the mash tun, stirring it with your mash paddle. This is easier to do with two people. You are trying to avoid any dough balls by stirring the grain as it goes in the mash tun. Then I put the insulated lid on the mash tun and start monitoring and recording the mash temperature over the next 60-90 minutes. My mash tun has a small electric heating pad on the bottom which helps maintain a stable mash temperature. Fancier systems can recirculate heated strike water through the mash tun to maintain any mash temp you want.
What “mashing” is doing is converting the more complex starches in the milled grain to simpler sugars, using an enzymatic reaction. Lower mash temperatures tend to create more “fermentables” which leads to higher alcohol levels. Higher mash temperatures give you more “mouth feel” which affect the taste. You want to stay as close as possible to the mash temperature that is specified in the recipe, unless you are trying to compensate for some other factor. On the other hand, try not to obsess over your mash temperature too much.
Mashing is one of my favorite parts of brewing, since it smells so good! It is like a combination of warm bread and oatmeal, and the grain in the mash tastes very sweet.
Vorlaufing and Sparging
After about 60-90 minutes, most of the starches in the milled grain should be converted to sugars. You then want to add some hotter strike water (170 degrees or warmer) to “mash out”, which stops the starch to sugar conversion process.
After that, you drain a few pitchers full of the liquid wort in the mash tun, one at a time, slowly pouring it back onto the top of the grain in the mash tun to “set” the grain bed (which filters the wort). This process is called vorlaufing. You want clear wort with no grain particles to come out of doing all of this.

Once you have vorlaufed, you start draining the liquid wort from the mash tun and transfer it to your boil kettle. You usually want between six and seven gallons of wort before the boil process starts. Usually, you will have to add more strike water to the mash tun to get enough wort for the boil. There are several different ways to sparge, such as batch sparging and fly sparging. The point of doing this is to have enough wort so that you end up with about five and half gallons left after what you will lose during the boil. Some or your wort will boil off (depending on the length and temperature of the boil). You will also lose some that is absorbed by your hops and you will lose some in your hoses.
Boiling
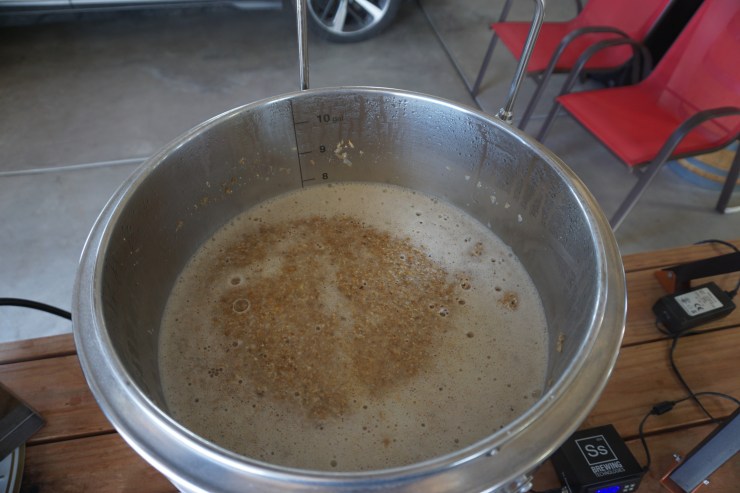
After you get all of the wort in the boil kettle, I always stir it, and then take a sample to check my pre-boil gravity. This helps you understand the efficiency of your mashing procedure, and it helps you figure out if you might want or need to add some more fermentables (such as sugar, honey, or malt extract) to push up your gravity level for a higher alcohol level.

As you heat the wort to boil temperature, you need to watch it very closely! When it gets close to boiling, you will have what is called “the hot break” where the wort can rapidly (in a few seconds) foam up and actually boil over, overflowing your boil kettle. This makes a huge mess, and is very embarrassing if any fellow home brewers are around.

You can avoid this by closely watching, and if necessary, turning down the heat under your boil kettle. You can also add a silicone anti-foaming drop to help avoid a boil over. Once you go through the hot break, you should be able to set the flame level to an appropriate level so that it is boiling vigorously, but not so hot as to cause a boil over later. Once you have a stable temperature, it is usually safe to stop watching the boil kettle so closely, and you can start doing some cleanup of the other equipment.

Most recipes call for a 60-90 minute boil. During the boil, you will add hops at different time points in order to accomplish different objectives. Early hop additions (earlier in the boil) will add bittering (since the aromatics will boil off during the boil), while later hop additions will give you more hop aroma.
The recipe will say something like “One ounce of East Kent Goldings at 60 minutes” which means you would add that much (if it is hop pellets) 60 minutes before the end of the boil. I always put my hop pellets in a perforated stainless steel hop basket that hangs down inside the boil kettle. This keeps the hop particles from getting into the wort, which reduces clogging and gives you cleaner, clearer wort.
Most recipes have several hop additions at different time points. I also will add a Whirlfloc tablet at 15 minutes and a Servomyces yeast nutrient capsule at 10 minutes before the end of the boil. The Whirlfloc tablet will attach to some of the proteins in the wort, which helps give you clearer wort going into the fermenter.
At the end of the boil, called flame-out, I turn on my whirlpool pump which recirculates the wort in the boil kettle. I also have my Jaded Hydra immersion chiller in the boil kettle, and I pump cold tap water though the immersion chiller, catching the run-off in a couple of plastic car boys. I dump the full car boys under a maple tree in my front yard. That Hydra chiller can take five gallons of boiling wort from boil temperature down to about 70 degrees Fahrenheit in about five-six minutes, depending on the time of year (which affects how cold my ground water is).
You want to chill your wort as quickly as possible to get a nice cold break (where the proteins in the wort drop out) and to minimize your chance of contamination. Once you are below boil temperature, random wild bacteria might get in your wort, which could “infect” it. This is not dangerous, but it will make most traditional beer styles just taste bad.
Fermentation
After chilling, you need to transfer the wort to your sanitized fermenter. After that, I will use my glycol chiller and fermenter heater as necessary to get the wort to the desired initial fermentation temperature. This will be much lower for lagers compared to ales.
Next, I will pump oxygen into the wort with a carb stone, and then “pitch” my yeast into the wort. The oxygen helps the yeast get started eating the sugar more quickly. Next, you seal up the fermenter and make sure the blow-off tube is submerged in water. This lets carbon dioxide from fermentation escape without letting any oxygen back in. The yeast eats the sugar and produces alcohol and carbon dioxide. Remember the yeast is actually making your beer.
The fermentation temperature is very important, depending on the beer style you are trying to make. It is probably the most important factor to the quality and taste of your beer, after basic sanitation. Most beers take one to two weeks to ferment. After that, you will either keg your beer (and force carbonate it with carbon dioxide) or you will bottle it (and add some sugar to each bottle) to carbonate it. This is called bottle conditioning. Most home brewers start off bottling, and then eventually switch to kegging, since bottling is much more labor and time intensive.
1 thought on “Brewing a Biere de Garde”